EFI direct boot on Debian 10 (EFI stubs)

Background

Unified Extensible Firmware Interface (UEFI) is a specification that describes an interface between a motherboard firmware and an operating system (OS). It follows the Extensible Firmware Interface (EFI), formerly implemented by Intel. It slowly replaces the old Basic Input Output System (BIOS) originally provided on IBM PC compatible computers.

Since few years motherboard manufacturers are providing both UEFI and BIOS compatible firmwares. The Linux kernel provides the appropriate stubs to be booted directly by a compatible UEFI firmware. It removes the need of an intermediate boot loader like GRUB.

If you don’t need an intermediate boot loader, because you have only one boot option for instance, you can setup EFI stubs on your Debian 10 system. It will be booted directly by your UEFI. In the following lines I will describe how to setup this configuration.

Configuration

EFI Boot partition

The first step is to ensure your system is installed with a readable EFI boot partition. Usually it is a small partition of your disk, located at the beginning and formatted using a very simple file system like FAT or EXT2. This partition will be used to store the EFI compatible binaries : either your GRUB or Linux kernel binaries. During the boot phase, the UEFI will traverse the partition and try to find compatible binaries. Here is an example on my workstation:

# lsblk
NAME        MAJ:MIN RM   SIZE RO TYPE MOUNTPOINT
sda           8:0    0 119.2G  0 disk
├─sda1        8:1    0   953M  0 part /boot/efi
└─sda2        8:2    0 118.3G  0 part /

If you don’t have this kind of partition, you will have to create one, maybe while re-installing your system. But this is outside the scope of this article, you can get more information here.

Synchronizing images

To be able to boot directly, the UEFI will need to access your kernel image and its ramdisk. It is possible only if both these images are in the partition mentioned above. On Debian systems, these images are available at the root at the file system, we’ll need to setup something to copy them in the EFI partition, each time it is updated. So that after any regular system update, the kernel and ramdisk images will be updated too in the special partition.

In Debian wiki EFI Stubs, the method used relies on post install hooks available for kernel and ramdisk images. Unfortunately it doesn’t work anymore on Buster release because the post install hooks for initramfs (ramdisk) is not available anymore. Thus we’ll do this update using systemd service units and unit triggers based on file monitoring. The idea is to create a one shot service unit that will copy the file. But instead of launching it at boot (or so), we’ll trigger it using a file monitor. We just have to declare it and systemd will do the job.

Kernel

Here we go. We start by creating the service unit in /etc/systemd/system/uefi-kernel-update.service :

# cat /etc/systemd/system/uefi-kernel-update.service
[Unit]
Description=UEFI Kernel update
After=network.target

[Service]
Type=oneshot
ExecStart=/bin/cp /vmlinuz /boot/efi/EFI/debian/

Then create the file trigger /etc/systemd/system/uefi-kernel-update.path:

# cat /etc/systemd/system/uefi-kernel-update.path
[Path]
PathChanged=/vmlinuz

[Install]
WantedBy=multi-user.target

Finally enable the trigger:

# systemctl enable uefi-kernel-update.path
Created symlink /etc/systemd/system/multi-user.target.wants/uefi-kernel-update.path → /etc/systemd/system/uefi-kernel-update.path.
# systemctl start uefi-kernel-update.path

Finally, you can test it works correctly by running touch /vmlinuz and checking in systemd logs that the unit was triggered:

# touch /vmlinuz
# journalctl -xn
Dec 14 18:14:18 fixe-damien systemd[1]: Starting UEFI Kernel update…
 -- Subject: A start job for unit uefi-kernel-update.service has begun execution
 -- Defined-By: systemd
 -- Support: https://www.debian.org/support
 -- A start job for unit uefi-kernel-update.service has begun execution.
 -- The job identifier is 2611.
 Dec 14 18:14:18 fixe-damien systemd[1]: uefi-kernel-update.service: Succeeded.
 -- Subject: Unit succeeded
 -- Defined-By: systemd
 -- Support: https://www.debian.org/support
 -- The unit uefi-kernel-update.service has successfully entered the 'dead' state.
 Dec 14 18:14:18 fixe-damien systemd[1]: Started UEFI Kernel update.
 -- Subject: A start job for unit uefi-kernel-update.service has finished successfully
 -- Defined-By: systemd
 -- Support: https://www.debian.org/support

Ramdisk (initrd)

Repeat the operation by creating a service unit and a path trigger to update /initrd.img file. Unit files are provided below:

# cat /etc/systemd/system/uefi-initrd-update.service
[Unit]
Description=UEFI ignited update
After=network.target

[Service]
Type=oneshot
ExecStart=/bin/cp /initrd.img /boot/efi/EFI/debian/
# cat /etc/systemd/system/uefi-initrd-update.path
[Path]
PathChanged=/initrd.img

[Install]
WantedBy=multi-user.target

Finally enable the unit and the trigger.

# systemctl enable uefi-initrd-update.path
Created symlink /etc/systemd/system/multi-user.target.wants/uefi-initrd-update.path → /etc/systemd/system/uefi-initrd-update.path.
# systemctl start uefi-initrd-update.path

Don’t forget to test it works with touch and journalctl.

Adding an UEFI boot entry

Now that we’re sure the kernel and the ramdisk will be correctly deployed and updated, we have to add a boot entry to the UEFI to let him know we can boot the kernel directly.

First we have to gather the kernel command line from GRUB configuration. In the file /boot/grub/grub.cfg, find the menuentry ... { ... } block that matches the entry to use in GRUB to boot. Then read the block and find the linux /boot/vmlinuz... entry, it provides the kernel command line parameters. For me it looks like:

menuentry 'Debian GNU/Linux' ... {
  ...
  echo   'Loading Linux 4.19.0-6-amd64 ...'
  linux  /boot/vmlinuz-4.19.0-6-amd64 root=UUID=3c51b884-79b9-46f5-aff9-a2d8f68cd308 ro quiet
  echo   'Loading initial ramdisk ...'
  initrd /boot/initrd.img-4.19.0-6-amd64
}

The kernel command line parameters are root=UUID=3c51b884-79b9-46f5-aff9-a2d8f68cd308 ro quiet. Then we can use efibootmgr to add an entry to the UEFI, don’t forget to update the command with your kernel parameters:

# efibootmgr -c -g -L "Debian (EFI stubs)" -l '\EFI\debian\vmlinuz' -u "root=UUID=3c51b884-79b9-46f5-aff9-a2d8f68cd308 ro quiet rootfstype=ext4 add_efi_memmap initrd=\\EFI\\debian\\initrd.img"

If the command fails, you may need to add an option to help to find the EFI partition like: --disk /dev/nvme0n1.

Finally you can check it is added correctly:

# efibootmgr
 BootCurrent: 0008
 Timeout: 1 seconds
 BootOrder: 0008,0000,0009,0003,0001,0002,0004,0005
 Boot0000* debian
 Boot0001* Hard Drive
 Boot0002* UEFI:CD/DVD Drive
 Boot0003* CD/DVD Drive
 Boot0004* UEFI:Removable Device
 Boot0005* UEFI:Network Device
 Boot0008* Debian (EFI stubs)
 Boot0009* debian

The next step is: reboot! If everything is fine, your computer should restart and skip GRUB. In case the configuration is not correct you may not able to reboot correctly. If it happens, you can still chose the boot entry manually in you UEFI menu (early computer startup) and boot on the standard debian entry. Then you can troubleshoot the problem.

Conclusion

Obviously, this is mainly a technical achievement because going through GRUB at boot time is not so long or expensive. But It was important for me to write a complete procedure to implement this as I’m using this configuration every day. I hope it will help some of you.

By the way, there’s some possible improvements. For instance it would be good to regenerate the UEFI loader boot entry automatically when the kernel command line parameters are updated. Even if it is not updated so often it would ensure not to miss any configuration change.

Sources

Why you shouldn’t use singleton on Android

A singleton is a common pattern frequently used in object oriented programming. Despite its good or bad reputation (depending on which side of the fight you are), it can leads to unsuspected issues when used in Java on Android platform. In this article we’ll explain what is a singleton and what are the issues you could face on Android.

What is a singleton ?

A singleton is a common pattern used in object oriented programming to ensure there’s only one instance of an object during the program lifetime.

public final class Singleton {
    // The unique object instance.
    private static final Singleton instance = new Singleton();

    private Singleton() {
        // Initialize your object here.
    }

    // A way to retrieve the unique instance from anywhere in your app.
    public static Singleton getInstance() {
        return instance;
    }
}

Then you can retrieve the instance anywhere in your code with something like:

...
Singleton myInstance = Singleton.getInstance();
...

You can have more details about the pattern and its usage here.

What is the problem with singletons on Android ?!

To understand the problem correctly we have to understand how a singleton instance is created and then destroyed. The instance creation is the easy part : as soon as you use the class (with Singleton.getInstance()) the class loader fetches the class and, if not done previously, initializes the static fields. Here it means executing new Singleton(). A new instance of the object is allocated then initialized and its reference stored in the instance field.

How is it destroyed then ? Theoretically the instance should be “garbage collected” when the last reference on it is released. But in the singleton case, the reference is held by the Singleton class itself, and the class is held by the class loader itself. So when does the last reference is released ?!

On a standard environment (let’s say Java program running on a computer), this reference would be released when the class loader is destroyed, either voluntarily or when the program quits.

On Android, the situation is different because you can’t predict when the class loader will be destroyed. As mobile devices are less powerful (or need to save energy), Android tries to optimize application start. Thus the Java virtual machine is loaded once in the application process and rarely stopped/destroyed. Usually it happens when the application crashes, is stopped because of memory pressure or when the phone shutdowns/reboots.

It is where it interacts with singletons. Every application component Application, Activity or Service provides one entry and one exit points:

class ... extends {Application, Activity, Service} {
    public void onCreate() { ... }
    public void onDestroy() { ... }
}

Regarding your application point of view, even if all the components of the app went through the onDestroy() exit point (in other words the application is gone, finished, …), the class loader is not destroyed. It means that all the singleton instances will stay in the state you left them. Contrary to what we expect, a singleton in an Android application leaves across components but also across multiple (but not all and not in a predictable way) application life cycles. It means that your standard Java singletons won’t be in brand new clean state as you could expect.

Conclusion

Be very careful when you use the singleton pattern on Android because it may retain a wrong state between two “runs” of your application. Android provides multiple ways to share states and information across Application, Service and Activity instances. I would recommend you to read the documentation carefully and use them instead of singletons.

Dynamic multimedia buffering and latency management with inter-arrival jitter

While working on latency control and reduction on a real-time multimedia application, I discovered that the first problem I had was the latency variations introduced by network conditions. The main challenge I had was estimating the network disorder only with an incoming RTP stream, without RTCP control and feedback packets. The following article describes the method used to estimate the network disorder and deduce an optimal buffer duration for the current conditions.

Background

Lets say we have an application that streams a multimedia (video and/or audio) real-time stream to a receiver. By real-time we mean that the content streamed may be interactive and can’t be send in advance to the receiver (like an audio/video call for instance).

Context

The source emits the stream over the network to the receiver. Usually the encoded content is split in small access units, encapsulated in RTP packets, sent over UDP. To simplify we’ll assume that the source only sends a video stream using RTP over UDP to the target.

The target receives the RTP packets on a random UDP port and obtains the packets through a socket, as usual. As RTP defines it, each packet has a timestamp that describes the presentation time of the access unit (see RFC3550 for more details on RTP). As an access unit might be bigger than the maximum RTP payload size, it might be split over multiple RTP packets. The method to do this depends on the codec, so avoid useless difficulties, we’ll consider that the receiver has a assembler that delivers each access unit reassembled with its presentation timestamp.

In the following paragraphs, we’ll consider the access units and their presentation timestamps before/after it enters/goes out the RTP/UDP transport layer. It is almost equivalent as working on RTP packets, so for the purpose of this article it is a reasonable assumption.

The problem: network and time reference

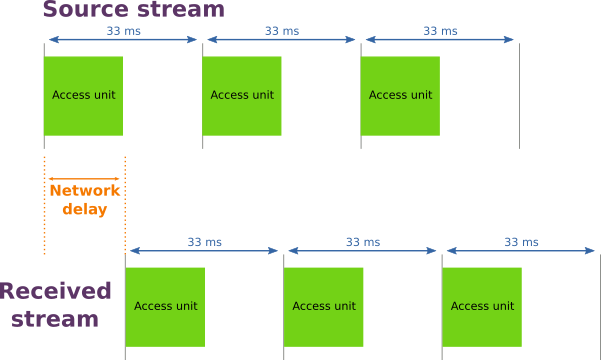
On emitter side, access units are produced on a regular basis. For a 30 frames per second video stream we usually have one access unit every 33 milliseconds (to be fair it depends on the codec). The illustration below shows a stream of access units emitted following a 33ms clock period (30 frames per second).

Picture 1: access units produced on a regular basis.

If the network was kind of perfect, we should receive exactly the same stream (with the same interval between access units) with a small delay due to the emission, transmission, reception and assembly operations.

Picture 2: streaming delay in a perfect network.

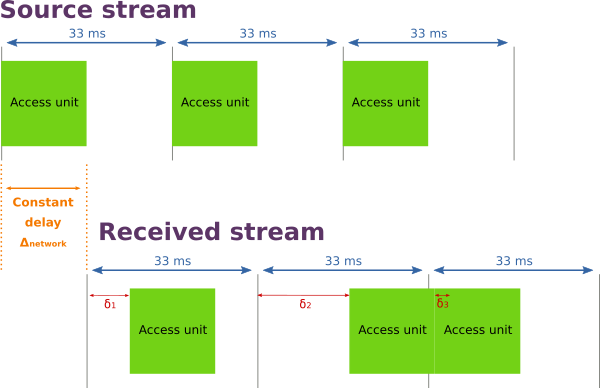
But in real life, the network delay is not a constant. There’s a constant part due to the incompressible processing and transmission delays, there is also a variable part due to network congestion. So the real result looks like the following illustration.

Picture 3: real-life stream delays.

Each access unit is delivered on the receiver with a delay, regarding its original clock, that varies according to network conditions. The latency of an access unit can be represented by:

\Delta_{frame}(n) = \Delta_{network} + \delta_n

Now let’s summarize the receiver situation:

  • it receives an access unit stream with their presentation timestamp (to be precise an equivalent RTP stream),
  • access unit are not delivered on a regular basis because the delivery depends on network conditions,
  • network conditions are evolving over time,
  • the only available time references are the access unit timestamp.

The challenge will be to find a way to estimate the required buffer duration to be able to play the access unit stream smoothly without being disturbed by network hazards.

Inter-arrival jitter as network conditions estimator

To estimate network congestion and then compute an adequate buffering duration, we need to find a indicator. Looking for some papers on the subject I found a RFC draft: Google Congestion Control Algorithm for Real-Time Communication. This algorithm deduces a Receiver Estimated Maximum Bitrate (REMB) using the inter-arrival jitter. Computing a bitrate is not exactly what we want to do but it uses only the incoming RTP packets and their timestamps to do the estimation.

Inter-arrival jitter

The timestamps associated to the frames are not enough to compute the overall latency of the stream. But thanks to them, we have a valuable information: the theorical delay between two frames. It is equivalent to the delay between two frames emissions from the source. The difference between timestamps T of frames n and n-1 is what we call the inter-departure time:

T(n) - T(n-1)

On the other hand, as a receiver, we can record the time of arrival for each frame and compute the difference between arrival timestamps t for frames n and n-1. This is what we call the inter-arrival time:

t(n) - t(n-1)

If we compare the inter-departure and the inter-arrival times we have an indicator of the network congestion: the inter-arrival jitter. In a formal way the inter-arrival jitter can be defined with the following formula:

J(n) = t(n) - t(n-1) - (T(n) - T(n-1))

A precise description of the inter-arrival time filter model is available in the RFC draft here.

Estimations

Observing the jitter is a good way to get information about network conditions because it represents the distance between the ideal situation (the departure delays) and the reality (the arrival delays) . The more the jitter is far from zero, the more the network is disturbed.

The first estimator we can compute is the average of the jitter. It provides an estimation of the network disorder over time, but to represent the “current” disorder correctly, it needs to be a sliding average. In Chromium implementation of GCC, an exponential moving average is used. It allows to keep the influence of the more recent jitter samples over a defined period while smoothing big variations.

\alpha \text{ is the moving average coefficient} \\
J(n) \text{ is the inter-arrival jitter for frame } n \\
J_{avg}(n) \text{ is the moving average for frame } n \\
J_{avg}(n) = \alpha * J(n) + (1 - \alpha) * J_{avg}(n-1)

The smoothing parameter α has to be chosen according to the use case and the implementation. If we’re playing a 30 frames per second stream, a value of 0.1 for α means the average applies applies overs 10 jitter values, so it takes into account the last 10 * 33ms = 330ms.

The average is a good start but a weak indicator because it is highly sensitive to variations and does not provide any information on the distribution of the jitter. To be more precise, we’re not interested in a buffer that satisfies the mean jitter but that takes into account most of the jitter of incoming frames. Don’t forget that our goal is to have a smooth playing experience!

We would like to have an indicator that allows us to estimate a buffer duration that smoothes the network impact for almost all frames. Saying this, it seems obvious we need a buffer duration with a confidence interval. If we compute the standard deviation σ from jitter samples, we can build a confidence interval around the mean jitter value that provides the correct buffering duration for 68% (average plus σ), 95% (average plus 2σ) or even 99.7% (average plus 3σ) and so on. To learn more on standard deviation and confidence interval, read here.

We can compute a moving variance over the jitter samples using the exponential average:

V(n) = \alpha * (J_{avg}(n) - J(n))^2 + (1 - \alpha) * V(n-1) 

And then the standard deviation for the last set of samples:

\sigma(n) = \sqrt{V(n)}

Let’s take an example! After some seconds, the average jitter is 15 ms and the standard deviation 37 ms. If we consider using the 3σ confidence interval, the buffer duration calculation is:

D_{buf}(n) = J_{avg}(n) + 3 * \sigma(n) = 15 + 3 * 37 = 126 \text{ ms}

Using this interval, it should cover 99.7% of the frame jitters. The buffer duration can be estimated regularly over the time to adjust the duration to the optimal value. Doing this, we are keeping the latency to the lowest value possible while preserving the stream quality.

Conclusion

Statistics over the inter-arrival jitter is the simpler way I found in the litterature to estimate a correct buffer duration. It provides a smooth playing experience while keeping the latency to the lowest possible level without breaking the quality. It requires very few inputs (only an incoming RTP stream with timestamps) to produce a reliable network quality indicator.

Acknowledgements

  • Tristan Braud for helping me understand the concepts behind jitter measures and the statistics leading to buffer duration.
  • Rémi Peuvergne  for advices on the article content and the drawings.

References

Android, ethernet and DHCP

Investigating an issue we had using DHCP with ethernet on Android, I found plenty of posts, threads or website showing their way to setup it with an ethernet interface. Knowing that Android natively supports it, at least since JellyBean, I decided to explain how it is implemented and the official way to configure it for ethernet.

Overview

Android uses dhcpcd, a dhcp client implemented as daemon (available in repo platform/external/dhcpcd) which is designed to monitor one or multiple interfaces, get addresses through dhcp, renew leases, etc. When the link status (not the interface one) changes from down to up, netd notifies the framework which launches, through the ConnectivityService and the EthernetDataTracker a DHCPCD instance on this interface. The service then waits for request completion (or failure) and propagate, if necessary, the “online” status to the whole framework.

How it works ?

Connectivity monitoring

Everything begins in the ConnectivityController constructor. A list of all desired connections is gathered from a ressource called com.android.internal.R.array.networkAttributes provided by a platform XML resource file (frameworks/base/core /res/res/values/config.xml). Usually this file is overridden by the device configuration overlay from the vendor. This file defines the kind of connection available on this platform, their priority, etc.

Always in this constructor, when an ethernet configuration is found in the array, it gets an instance of the EthernetDataTracker. The priority filed in the configuration helps the controller to choose which connection to use first. When an ethernet one is present, it often has the highest priority.

Those trackers, including the ethernet one, are used by the controller to monitor the state of the connections to external networks (i.e. the internet). It gets link status from them and depending on witch one is active (link up, ip configuration done) it reports internet connectivity status to the applications.

Ethernet interface management

The ethernet interface management is done through the EthernetDataTracker. The class implements the NetworkStateTracker interface used by the ConnectivityController to do its monitoring job. This singleton class is designed to handle only one interface at a time.

The instance is got by the ConnectivityController which triggers the startMonitoring() method. On this event the tracker connects to netd, the Android network daemon, through binders to get interfaces and, later, monitor their state.

/platform/frameworks/base/+/jb-dev/core/java/android/net/EthernetDataTracker.java
205
206
207
208
209
210
211
212
213
214
215
216
217
218
219
220
221
222
223
224
225
226
227
228
229
230
231
232
233
234
235
236
237
238
239
240
241
242
public void startMonitoring(Context context, Handler target) {
        mContext = context;
        mCsHandler = target;
        // register for notifications from NetworkManagement Service
        IBinder b = ServiceManager.getService(Context.NETWORKMANAGEMENT_SERVICE);
        mNMService = INetworkManagementService.Stub.asInterface(b);
        mInterfaceObserver = new InterfaceObserver(this);
        // enable and try to connect to an ethernet interface that
        // already exists
        sIfaceMatch = context.getResources().getString(
            com.android.internal.R.string.config_ethernet_iface_regex);
        try {
            final String[] ifaces = mNMService.listInterfaces();
            for (String iface : ifaces) {
                if (iface.matches(sIfaceMatch)) {
                    mIface = iface;
                    mNMService.setInterfaceUp(iface);
                    InterfaceConfiguration config = mNMService.getInterfaceConfig(iface);
                    mLinkUp = config.isActive();
                    if (config != null && mHwAddr == null) {
                        mHwAddr = config.getHardwareAddress();
                        if (mHwAddr != null) {
                            mNetworkInfo.setExtraInfo(mHwAddr);
                        }
                    }
                    reconnect();
                    break;
                }
            }
        } catch (RemoteException e) {
            Log.e(TAG, "Could not get list of interfaces " + e);
        }
        try {
            mNMService.registerObserver(mInterfaceObserver);
        } catch (RemoteException e) {
            Log.e(TAG, "Could not register InterfaceObserver " + e);
        }
    }

The whole available interface list is gathered from netd and browsed to find one which matches ethernet interface pattern. This pattern is provided by a platform resource config_ethernet_iface_regex. When an interface is found, the tracker asks netd to set it up and breaks the search loop. Before breaking, it issues a reconnect() call which will eventually start the DHCP auto configuration.

DHCP

On reconnect() event, the runDhcp() call spawns a thread which will start the dhcp request using NetworkUtils.runDhcp(…). This method uses a native JNI implementation to launch a DHCPCD process and wait for its result (or failure) before return. The implementation is located in frameworks/base/core/jni/android_net_NetUtils.cpp which is a wrapper designed to use the netutils library (system/core/libnetutils/dhcp_utils.c). Everything is happening in dhcp_do_request:

/platform/system/core/+/jb-dev/libnetutils/dhcp_utils.c
166
167
168
169
170
171
172
173
174
175
176
177
178
179
180
181
182
183
184
185
186
187
188
189
190
191
192
193
194
195
196
197
198
199
200
201
202
203
204
205
206
207
208
209
210
211
212
213
214
215
216
217
218
219
220
221
222
223
224
225
226
227
228
229
230
231
232
233
234
235
236
237
238
239
240
241
/*
 * Start the dhcp client daemon, and wait for it to finish
 * configuring the interface.
 *
 * The device init.rc file needs a corresponding entry for this work.
 *
 * Example:
 * service dhcpcd_ /system/bin/dhcpcd -ABKL
 */
int dhcp_do_request(const char *interface,
                    char *ipaddr,
                    char *gateway,
                    uint32_t *prefixLength,
                    char *dns1,
                    char *dns2,
                    char *server,
                    uint32_t *lease,
                    char *vendorInfo)
{
    char result_prop_name[PROPERTY_KEY_MAX];
    char daemon_prop_name[PROPERTY_KEY_MAX];
    char prop_value[PROPERTY_VALUE_MAX] = {'\0'};
    char daemon_cmd[PROPERTY_VALUE_MAX * 2];
    const char *ctrl_prop = "ctl.start";
    const char *desired_status = "running";
    /* Interface name after converting p2p0-p2p0-X to p2p to reuse system properties */
    char p2p_interface[MAX_INTERFACE_LENGTH];
    get_p2p_interface_replacement(interface, p2p_interface);
    snprintf(result_prop_name, sizeof(result_prop_name), "%s.%s.result",
            DHCP_PROP_NAME_PREFIX,
            p2p_interface);
    snprintf(daemon_prop_name, sizeof(daemon_prop_name), "%s_%s",
            DAEMON_PROP_NAME,
            p2p_interface);
    /* Erase any previous setting of the dhcp result property */
    property_set(result_prop_name, "");
    /* Start the daemon and wait until it's ready */
    if (property_get(HOSTNAME_PROP_NAME, prop_value, NULL) && (prop_value[0] != '\0'))
        snprintf(daemon_cmd, sizeof(daemon_cmd), "%s_%s:-h %s %s", DAEMON_NAME, p2p_interface,
                 prop_value, interface);
    else
        snprintf(daemon_cmd, sizeof(daemon_cmd), "%s_%s:%s", DAEMON_NAME, p2p_interface, interface);
    memset(prop_value, '\0', PROPERTY_VALUE_MAX);
    property_set(ctrl_prop, daemon_cmd);
    if (wait_for_property(daemon_prop_name, desired_status, 10) < 0) {
        snprintf(errmsg, sizeof(errmsg), "%s", "Timed out waiting for dhcpcd to start");
        return -1;
    }
    /* Wait for the daemon to return a result */
    if (wait_for_property(result_prop_name, NULL, 30) < 0) {
        snprintf(errmsg, sizeof(errmsg), "%s", "Timed out waiting for DHCP to finish");
        return -1;
    }
    if (!property_get(result_prop_name, prop_value, NULL)) {
        /* shouldn't ever happen, given the success of wait_for_property() */
        snprintf(errmsg, sizeof(errmsg), "%s", "DHCP result property was not set");
        return -1;
    }
    if (strcmp(prop_value, "ok") == 0) {
        char dns_prop_name[PROPERTY_KEY_MAX];
        if (fill_ip_info(interface, ipaddr, gateway, prefixLength,
                dns1, dns2, server, lease, vendorInfo) == -1) {
            return -1;
        }
        /* copy dns data to system properties - TODO - remove this after we have async
         * notification of renewal's */
        snprintf(dns_prop_name, sizeof(dns_prop_name), "net.%s.dns1", interface);
        property_set(dns_prop_name, *dns1 ? ipaddr_to_string(*dns1) : "");
        snprintf(dns_prop_name, sizeof(dns_prop_name), "net.%s.dns2", interface);
        property_set(dns_prop_name, *dns2 ? ipaddr_to_string(*dns2) : "");
        return 0;
    } else {
        snprintf(errmsg, sizeof(errmsg), "DHCP result was %s", prop_value);
        return -1;
    }
}

The whole function is relies on a DHCPCD service usually declared like this in the init.rc platform file:

service dhcpcd_eth0 /system/bin/dhcpcd -ABDKL
    class main
    disabled
    oneshot

First the function starts this service setting the property ctl.start to dhcpcd_eth0:-f /path/to/configuration/file.conf -d eth0. This starts the service using the Android usual way and adds some parameters to initial init.rc declaration. The implementation now waits for the property init.svc.dhcpcd to check if the service is running and then waits for dhcp.eth0.result to check if the service ended and get a result, or not. The success of the failure is returned to callers, all along the call stack which ends in the famous EthernetDataTracker.

If the whole DHCP request fails for any reason, the process will be restarted on next interface up event.

Conclusion

Android is able to manage an ethernet interface with DHCP. The implementation is a bit simple but its enough for almost all cases. The only drawback we found is the DHCP timeout which is a bit short. Indeed if your network has a switch not configured in fast port mode, the request may timeout before the switch let the traffic go through himself. Thus you won’t ever be able to get an address, except if you re-trigger the service using ctl.start. But this is another story, for an other article 😉

When X-loader hangs …

I recently decided to play with an old OMAP3 EVM development board from Mistral. My aim was to run a Rowboat Android distribution and use it as my home automation server.

I decided to first use an SDCard for experimentations before using the embedded flash. The board first boots an internal ROM which expects to find the first primary DOS partition with a FAT32 file system in it. When found, it seeks for a file named MLO, loads it and jumps into.

The MLO file is traditionally X-loader, a primary bootloader from TI (which seems to be derived from u-boot). When started it looks for an u-boot.bin file in the same partition as the ROM, then loads and launch it. Then you can interact with the loader and parametrize/load your kernel.

So I first gathered binary versions of X-loader and u-boot from an online repository here: https://code.google.com/p/rowboat/downloads/list

Then I prepared the sdcard using TI wiki: http://processors.wiki.ti.com/index.php/SD/MMC_format_for_OMAP3_boot

I configured the board SW4 switch to boot on MMC, see: http://processors.wiki.ti.com/index.php/GSG:_OMAP35x_DVEVM_Hardware_Setup#Main_Board_SW4

And from the serial console I got:

Texas Instruments X-Loader 1.41
Could not read bootloader!
X-Loader hangs

The solution is pretty simple but it took me some time! X-loader does the assumption that the partition where it expects to find u-boot is the first one, thus located 512 bytes from the beginning of the sdcard. It was true years ago when sdcard blocks were 512 bytes long like classic hard drives. But now it’s often 2048 or 4096 bytes and the first partition made by fdisk commands found in TI wiki are not at the desired offset. The solution is to configure fdisk to use 512 bytes block size, and everything works. Here is a example of a correct fdisk command line:

fdisk -b 512 -c=dos -u=cylinders -H 255 -S 63 /dev/sdX

I hope this will help!

Memoization!

Some days ago, a friend showed me the following post The six common species of code, and I’ve been upset because it is easy to critize, or laugh at code writers, but it is harder to provide materials to write good algorithm. Obviously, they laugh, but as always … that’s all. A bit more seriously, reading this small Fibonacci example, I remembered old school times and I decided to create this article about Memoization.

Memoization is a way to write recusive algorithm in order to be faster. It uses a data cache to avoid multiple and redundant function calls. Indeed, sometimes, due to recursion, a data could be computed multiple times (this is typically the case with Fibonacci recursive implementation). The aim of memoization is to cache these data and reuse them when possible. In the following lines, we’ll look at an example applied on the Fibonacci serie.

Fibonacci serie standard implementation

The serie is defined by:

F(0) = 1
F(1) = 1
F(n) = F(n-1) + F(n-2)

It could be easily implemented by a recursive function like this:

unsigned int fibonacci(unsigned int n)
{
        if (n == 0 || n == 1) {
                return 1;
        } else {
                return fibonacci(n - 1) + fibonacci(n - 2);
        }
}

But this naive form has a huge cost. Indeed, the number of call to fibonacci(…) will grow exponentially with n, thus the run time will explode. Run a fibonacci(100) could take hours and lead to a stack overflow. If we look carefully, we see that this implementation is quite inefficient. Each value of the serie is computed multiple times: F(n) will evaluate F(n-2) and F(n-1) which will evaluate F(n-2) again, etc.

A way to avoid this bad day effect is to use memoization.

Memoized implementation

The memoized implementation will use a small local data cache to store computed values. These values will be used instead of computing a series rank again. Here is a trivial C-styled implementation, assuming that the cache is allocated large enough to handle the call to fibonacci(n) and cache[0] = cache[1] = 1.

unsigned int *cache;

unsigned int fibonacci(unsigned int n)
{
        unsigned int f;
        if (cache[n] != 0)
                f = cache[n];
        else {
                f = fibonacci(n - 2) + fibonacci(n - 1);
                cache[n] = f;
        }
        return f;
}

Each time we ask for a fibonacci value, we look for it in the cache, and we compute it only if it is not available. Thus, as soon as a path of the call tree have been computed, all intermediate values are cached and a redundant call is almost costless.

This piece of code will have a linear run time function of n, but will still have exponential growth of the call stack. I’ll probably post a stack-size improved version of the algorithm in an update.

Performance evaluation

I compared the run times of the two implementations on my computer with a number of iterations between 10 and 55.

fibo-measures

The memoized implementation is obviously faster, execution time begins to increase around 100,000 iterations (not represented here).

Conclusion

Memoization is a code optimization technique used to speed up algorithm by caching data to avoid redundants calculations. As we see with the Fibonacci series example, this method is really efficient.

But to be fair, we have to mention that a memoized solution is not perfect. Indeed, using a cache implies potentially big memory consumption. In our example, these kind of issues appears around 500,000 iterations. Plus, with such a high number we’ll have to deal with really big integer values and overflows.

As always, an optimisation method is not perfect, and should only be applied in a second time. In other words, a good software design is never base on optimizations: Premature optimization is the root of all evil (or at least most of it) in programming.” (Donald Knuth).

Compost on my terrace!

Since few weeks, I was tired to regularly take an almost empty dustin bin out from my flat just because it was smelling bad. So, a bit urged by a eco-friendly feeling, I decided to make compost myself. There still were a problem … I’m living in a flat!

A friend suggested me too to do it in a bucket, with a lid, on my terrace. We built it together. We would like it to be practical but a bit pleasing too. Here is the furnitures list:

  • 15 liters bucket
  • A flat bowl wider than the bucket
  • Some soil
  • Flower or grass seeds
Photo du matériel initial.
Initial materials.

In a first time, drill the bottom of the bucket with some small holes. It’ll let compost liquids drain away from the container. Then put the soil in the flat bowl.

Holes at the bottom.

Place the bucket on the soil in the plate and sow your seeds around. It’ll bring a bit of decoration. Plus, the flowers will eat what your compost drain in the soil.

Ready to use!

You can put a bit of soil on bucket’s bottom if you want, it’ll ease future clean up. Choose a place under cover of strong rains, put your compost bucket here and close the lid. After a few weeks, the flowers (grass) grow(s) and your compost heap is nice.

Few weeks later.

For what it worth, I found a compromise between my dustbin problem and my ecological conscience 😉

Houston, we’ve had a problem here.

Trying to understand a strange UI freezing bug on our platform, I found a funny trace in Android views mechanism.

private void fallback(boolean fallback) {
    destroy(true);
    if (fallback) {
        // we'll try again if it was context lost
        setRequested(false);
        Log.w(LOG_TAG, "Mountain View, we've had a problem here. " 
                     + "Switching back to software rendering.");
    }
}

Android funny sources

During my job, I regularly walk into Android sources and, sometime I found funny things in source code.

I found the first one in the build toolchain where all Makefile functions are defined. Do you wanna go out with the Android ? Because he won’t.

.PHONY: out
        @echo "I'm sure you're nice and all, but no thanks."

I found the following one when the multi-users feature appeared in JellyBean (4.1/4.2):

/**
 * Used to determine whether the user making this call is subject to
 * teleportations.
 * @return whether the user making this call is a goat
 */
public boolean isUserAGoat() {
    return false;
}

The funnier aspect is that this method is officially documented here.

[edit 2013-08-22] More funny sources in the well named category 😉

KDE freezes at startup

Since KDE 4.7, always on my favorite Arch Linux, I’m facing an annoying issue at start-up. The KDE environment freezes until a sound is emitted and I have to wait for almost 20 seconds before I can use my desktop.

It seems that KMix sound system is too slow to start and the session manager has to wait for it before playing the start up sound. The simpler workaround is to disable this sound, you just have to follow these steps:

  1. Open “System Settings” application,
  2. Go to “Application and System notifications“,
  3. In “Applications” tab, choose “KDE Workspace” in the list view,
  4. Click on “Login” and un-check “Play a sound” checkbox,
  5. Click on “Apply” button.

It should solve the problem. I made this article from the following one:  http://krisko210.blogspot.fr/2012/02/kde-freezes-for-few-seconds-after-login.html but I did not reuse the driver modifications because it did not seemed necessary.

Hope it helps 😉